
Siren 10.3 introduces Siren Machine Learning (Siren ML), bringing deep-learning solutions to Elasticsearch users (and of other backends that Siren supports). Designed to leverage modern open-source machine-learning frameworks such as TensorFlow, Siren ML aims to provide data investigators with a stress-free way to reap the benefits of using state-of-the-art “auto” machine-learning methods on their data.
Specifically, the first release of Siren ML offers two types of machine-learning model for handling numerical time series data—unsupervised anomaly detection and future value prediction (forecast).
Siren ML highlights
- Machine learning made easy. There is no requirement for prior knowledge of, or expertise in, machine learning. The intuitive UI of the new machine-learning plugin makes creating, updating, and activating models a breeze.
- Best in class “Auto ML”: Siren ML takes care of hyperparameter optimization to find the best model to fit your data. When fitting models to data there is no ‘silver bullet’, a model that provides optimal performance across all datasets. The settings that are required prior to training models are commonly referred to as hyperparameters, which encompass a broad range of required settings such as the model size, the amount of regularization applied, and the learning rate.
- View machine learning results on your dashboards. The new Machine Learning Viewer visualization enables results from machine-learning models to be integrated into dashboards.
- Install and run with a single command. Siren ML is available as a docker image, and you can start simply with docker or docker-compose.
Motivation and Design
Machine learning offers the opportunity to augment and automate aspects of data investigations.
The key components to achieving this at Siren are:
- Ease of use and integration. All Siren ML functions and lifecycle are UI driven and make use of ‘Auto ML’ technique to minimize or eliminate configuration parameters. Siren ML outputs can be visualized and monitored just like any other data stream (they are stored in Elasticsearch).
- Flexibility for many use cases. We designed Siren ML based on TensorFlow and Python. Expect Siren ML to expand very quickly from the initial two scenarios (time series anomaly detection/prediction) to dozens of others supported by modern deep-learning architectures.
- Scalability and IT Governance: Siren ML pushes computations to Elasticsearch whenever possible (for example, histogram aggregations), so it can be quite efficient also on large datasets. Furthermore, we distribute it in GPU and CPU versions, and it can be scaled in clusters.
The Model creation workflow
Siren ML is accessible through the machine-learning application in Siren Investigate. Once the machine-learning plugin is installed, the following icon will be displayed the next time you run Siren Investigate.
The machine learning application has three main pages, as shown in the following screenshot:
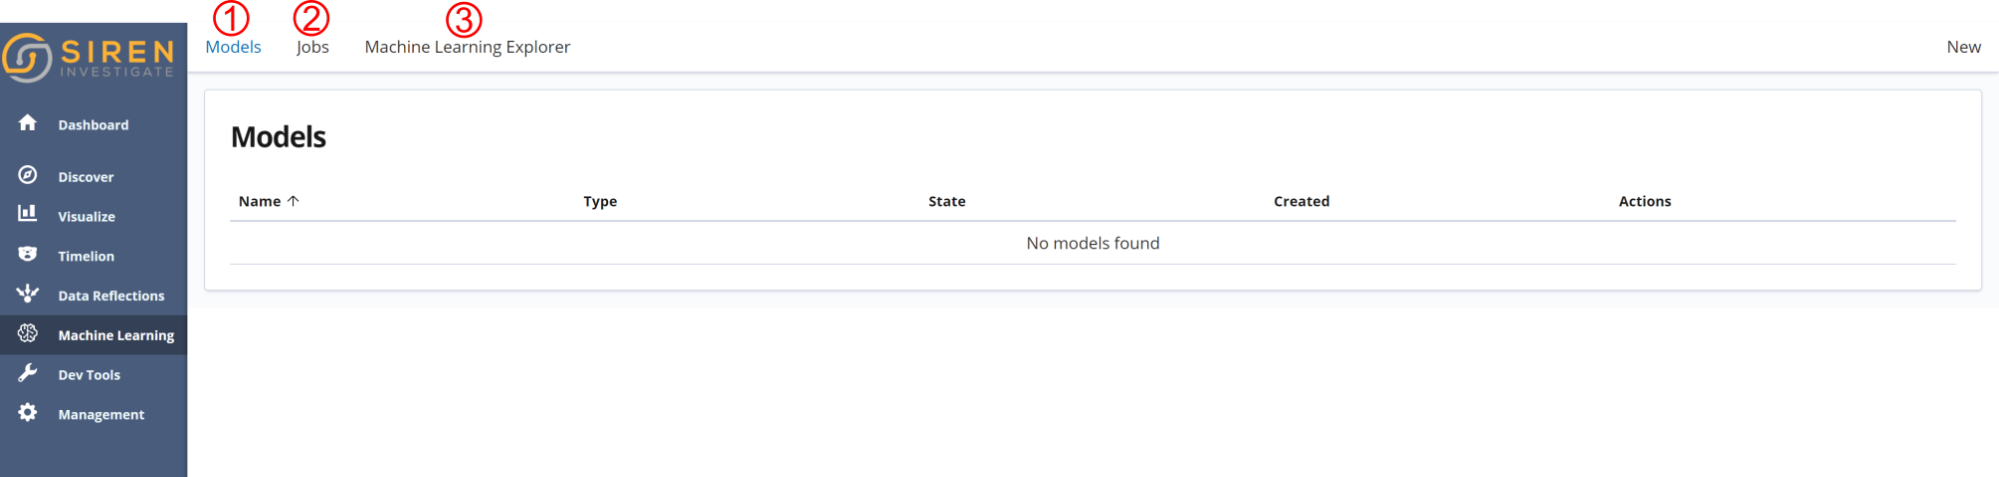
- Models. This is the main page for viewing and managing all ML models. It shows a summary of each model—model type, state, creation time, along with quick access to common actions for live activation, historical detection, and deletion of each model.

- Jobs. Creating, updating, and activating models are types of machine-learning jobs. This page shows the status of each job, as well as a history of previous jobs. When a job is in progress, its status is Running when the job is queued and waiting to begin, its status is Pending; when a job is finished, its status is Complete. When the job is finished, you can click on it to get more detailed information.

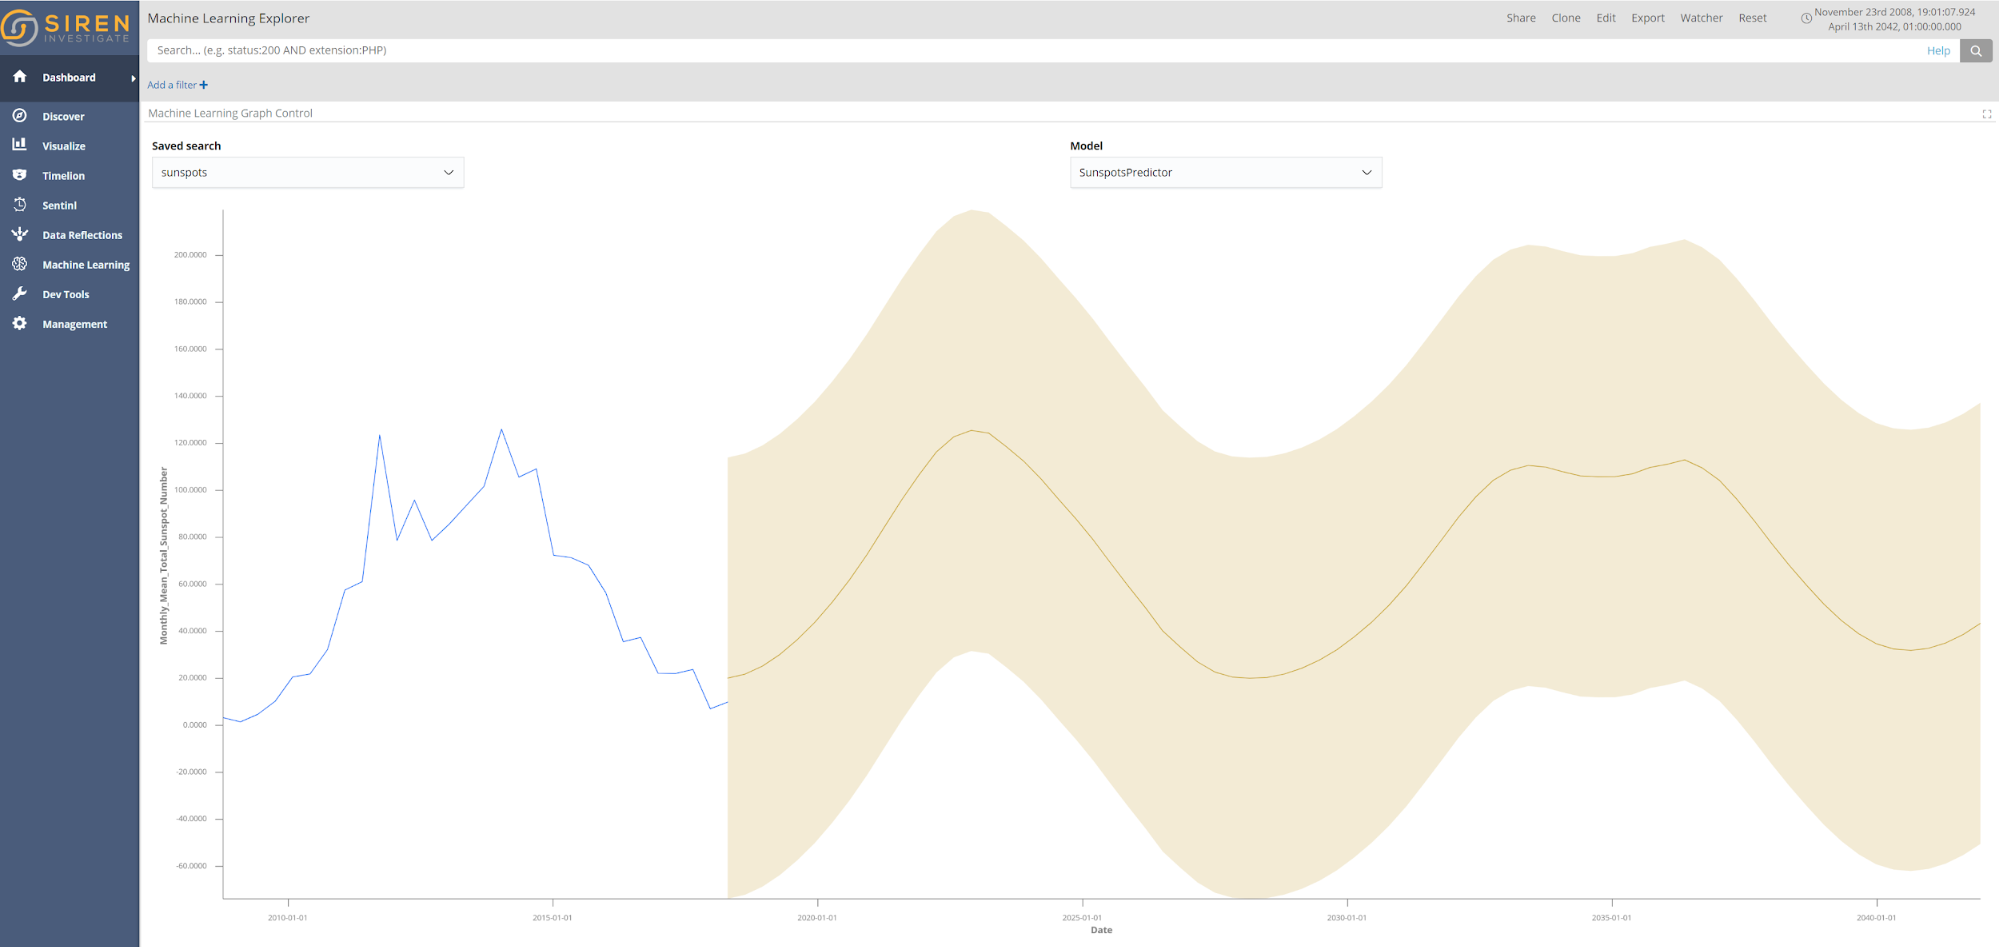
- Machine Learning Explorer. The Siren ML plugins installs a new visualization specifically for ML visualizations (displaying predictions and confidence intervals, for example). This visualization is called Machine Learning Explorer and it can easily be integrated into existing dashboards. The following screenshot shows future prediction results presented in Machine Learning Explorer for monthly sunspots until the year 2042, based on the monthly sunspots dataset.
Creating and Using Machine Learning Models
Step 1. Create a new model
The first time you access the machine-learning application there will be no models. Click New to begin the model creation process:

Step 2. Select a saved search
Each machine-learning model is associated with a Saved Search, which provides the data for both training the model initially and then making predictions. As you can filter saved searches, they offer great flexibility for creating machine-learning models. As an example, if a business has sales data from multiple stores, different saved searches can be created for each store location. Different machine learning models can then be trained to detect anomalies or predict sales specifically for each store. If the model had been trained directly on an aggregation of the sales data, the anomalies or predictions would be a weighted average of all the stores instead of considering each store independently’; this would likely reduce the potential effectiveness of applying machine learning to the situation.

In the coming months, Siren ML will offer multivariate models which take data from multiple Saved Searches. In doing so, the ML models will be able to learn more complex relationships and patterns, which will both improve accuracy and provide greater insight
Step 3. Pick a model type
In the first release of Siren ML, two model types are offered, anomaly detection and future prediction.

Both the anomaly detection and future prediction models are based on deep Long Short Term Memories networks (LSTMs). Categorical embedding of the timestamps is included if the range of training data is appropriate. This enables greater accuracy in long-term seasonal trends which are greater than the scale of the sequential inputs of the network.
The unsupervised anomaly detection models use Bayesian dropout to calculate the upper and lower bounds of their predictions. For more information on Bayesian dropout see the original paper, the means of calculating the confidence intervals of predictions used in Siren ML is similar to the methodology outlined by researchers at Uber.
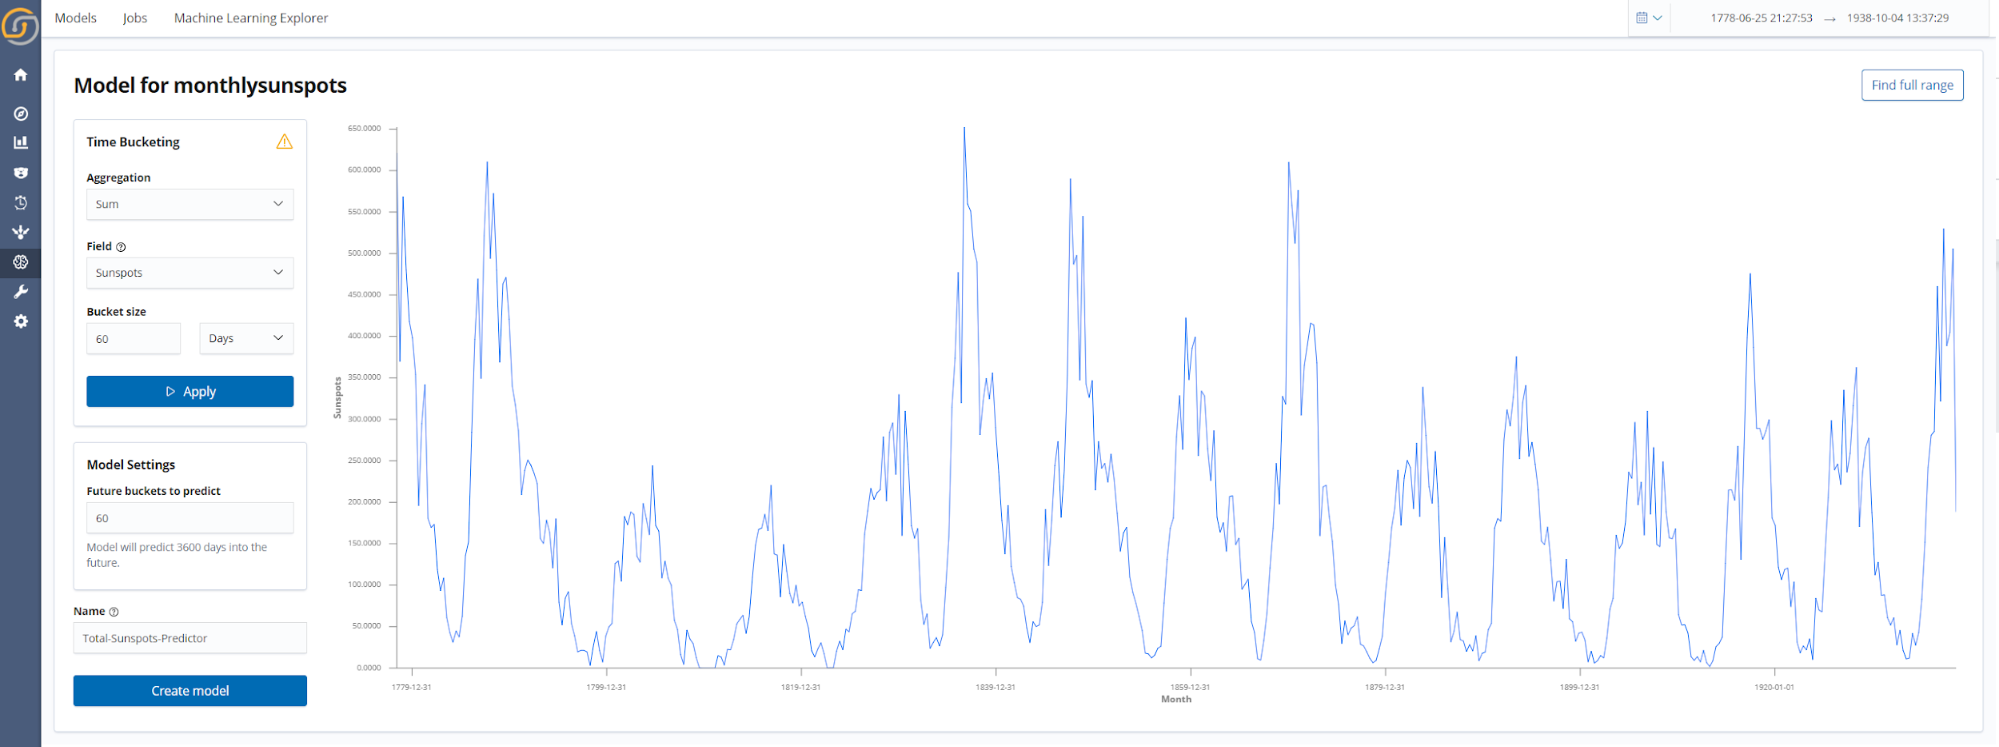
Step 4. Set the model parameters
A small number of key parameters which define the model behaviour must be selected. These include the parameters for Time Bucketing (field, aggregation type, and bucket size), the model name, and in the case of future predictions how far into the future the model will predict.
After you set the Time Bucketing parameters and click Apply, the full time series will be displayed. This data visualization is interactive—the easiest way to refine the training data range is to simply click and drag on the graph to select the desired time range. To reset the graph to the original view, simply click the Find Full Range button. The data shown in the graph when you click Create Model will be used to train the model.
Time series machine-learning models are trained on date histogram aggregations, which offers a number of advantages. First, it means that big data is handled by Elasticsearch. Therefore, regardless of whether the Saved Search consists of kilobytes or petabytes of data, the machine learning model can be trained with the same memory requirements and computational power. Additionally, by using aggregations the data is represented with constant time intervals, which is of considerable benefit when training sequential models.
Step 5. Monitoring model training progress
After creating your model you will be redirected to the Model page, where the new model will be listed. As the following screenshot shows, the training progress can be seen at a glance with the progress bar. When the progress bar is filled, the training is complete and the state of the model will be changed to Trained.

Clicking the model name gives more detailed information on the model training.
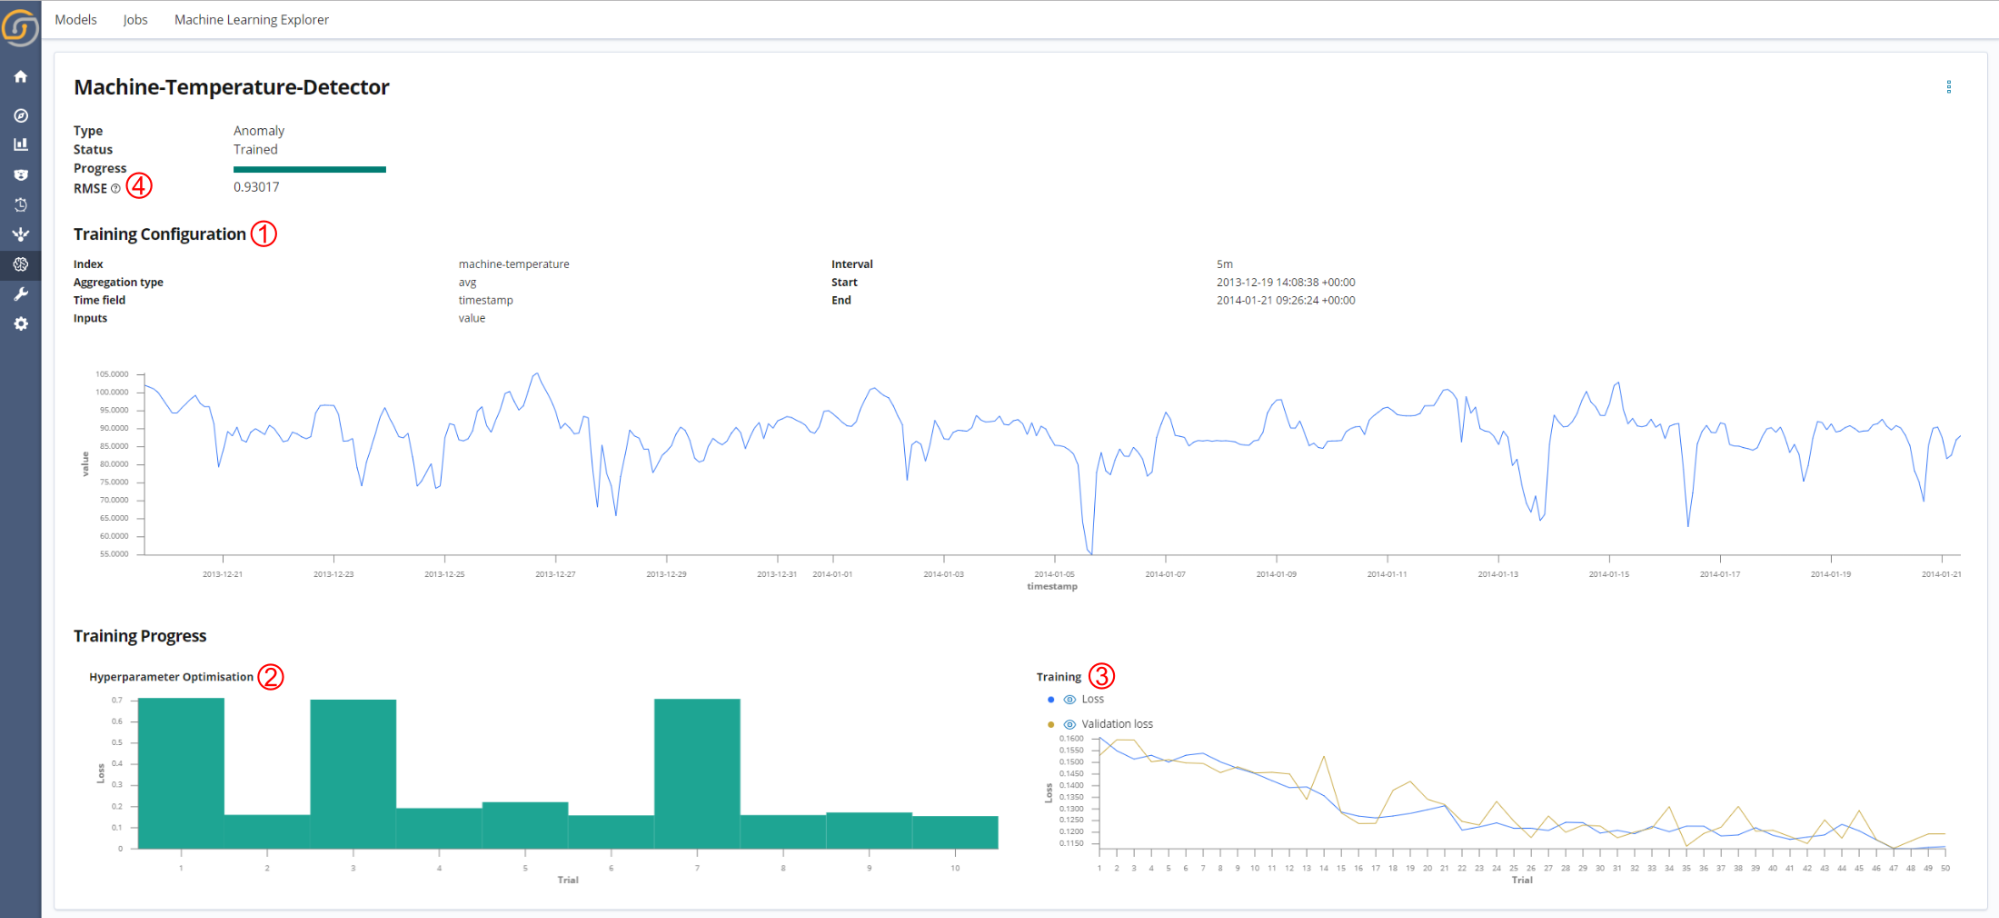
The model information page shows:
- A summary of the model parameters used for training the model (which were selected in Step 4).
- The hyperparameter trial results. Within each hyperparameter trial a different set of hyperparameters are assessed during a shortened model training. The score for each hyperparameter trial is the minimum validation loss achieved. The hyperparameters that result in the lowest hyperparameter trial score are used for the final model training.
- The loss curves for the final training of the model.
- This displays both the loss for the training set and the validation set. The training set is the data used to update the model parameters, and the validation set is used to assess if the model is generalizing well on unseen data. The graph is updated in real time, with results being logged to Elasticsearch by a custom Keras callback.
- The parameters for the final trained model are saved when the validation loss is at its lowest; therefore, the state of the model that generalized best to unseen data during training is the one that is used for inference when the model is activated. Early stopping is applied to stop training in cases when the validation loss has stopped improving.
- Root mean square error (RMSE) of the model predictions on a test set. This metric is displayed to show the quality of the model predictions. The lower the value is, the better.
Step 6. Model actions
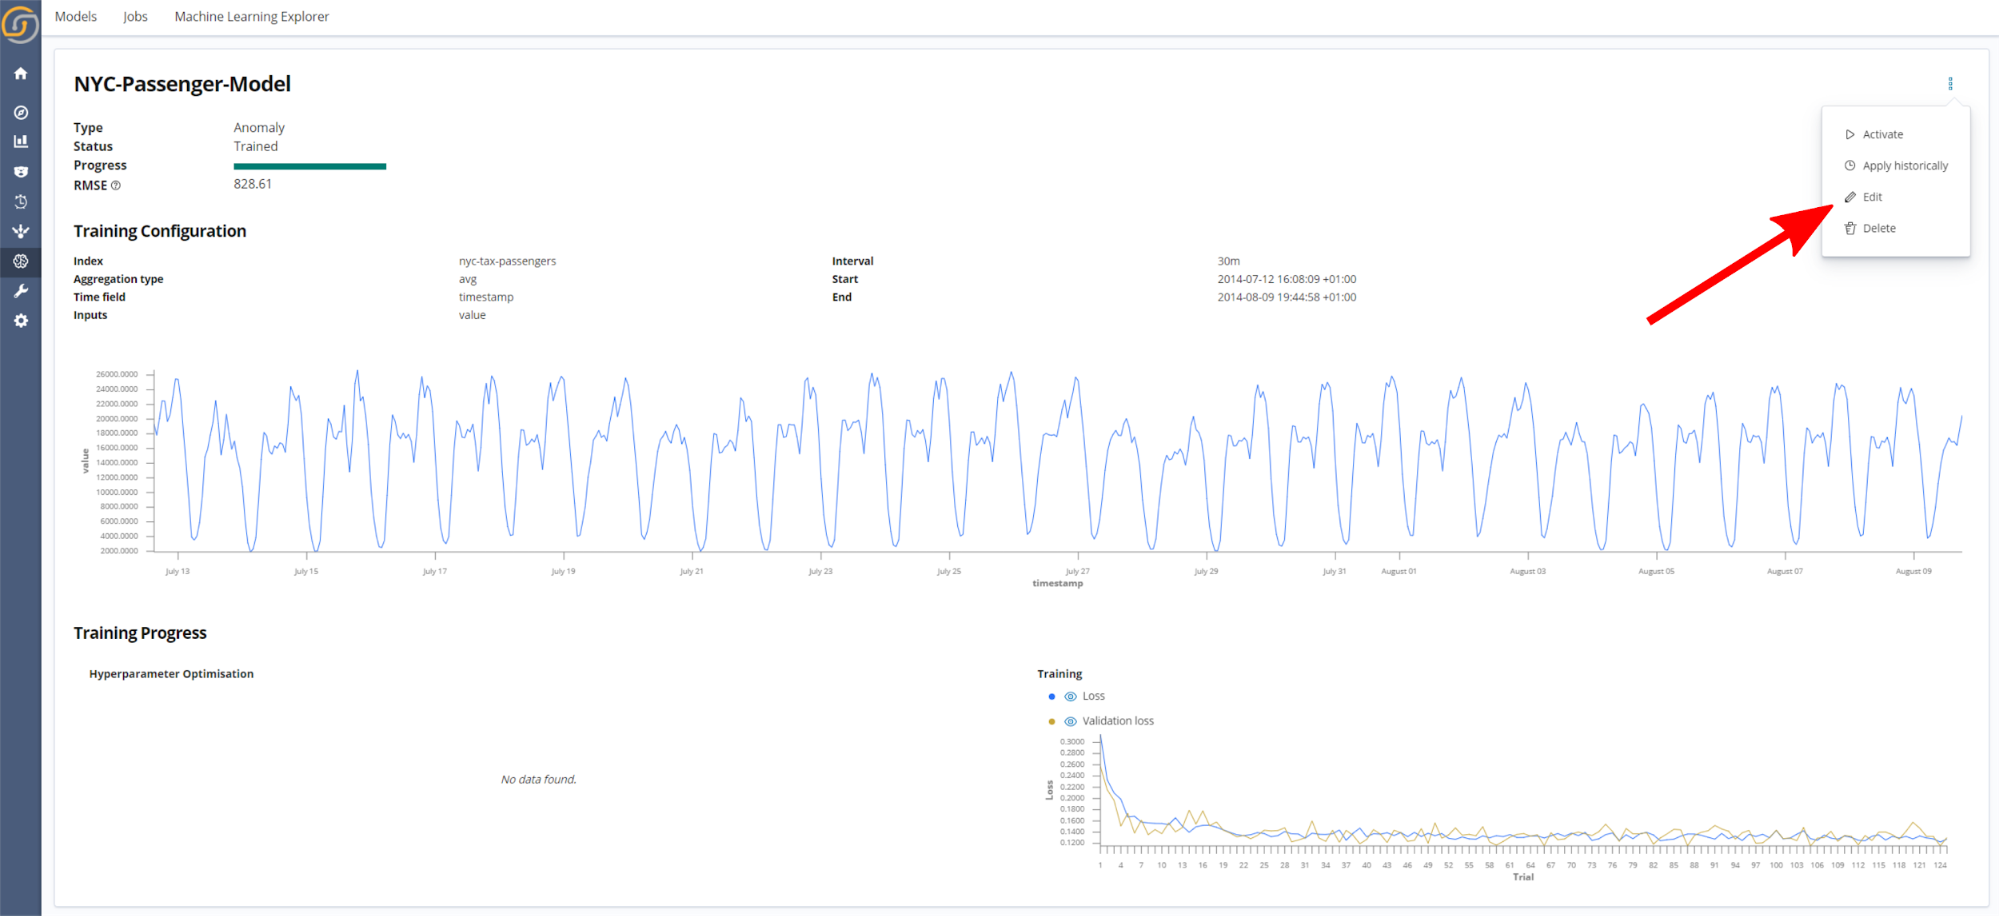
Once a model has been trained, a number of actions can be accessed from the model information page, as shown in the following screenshot.
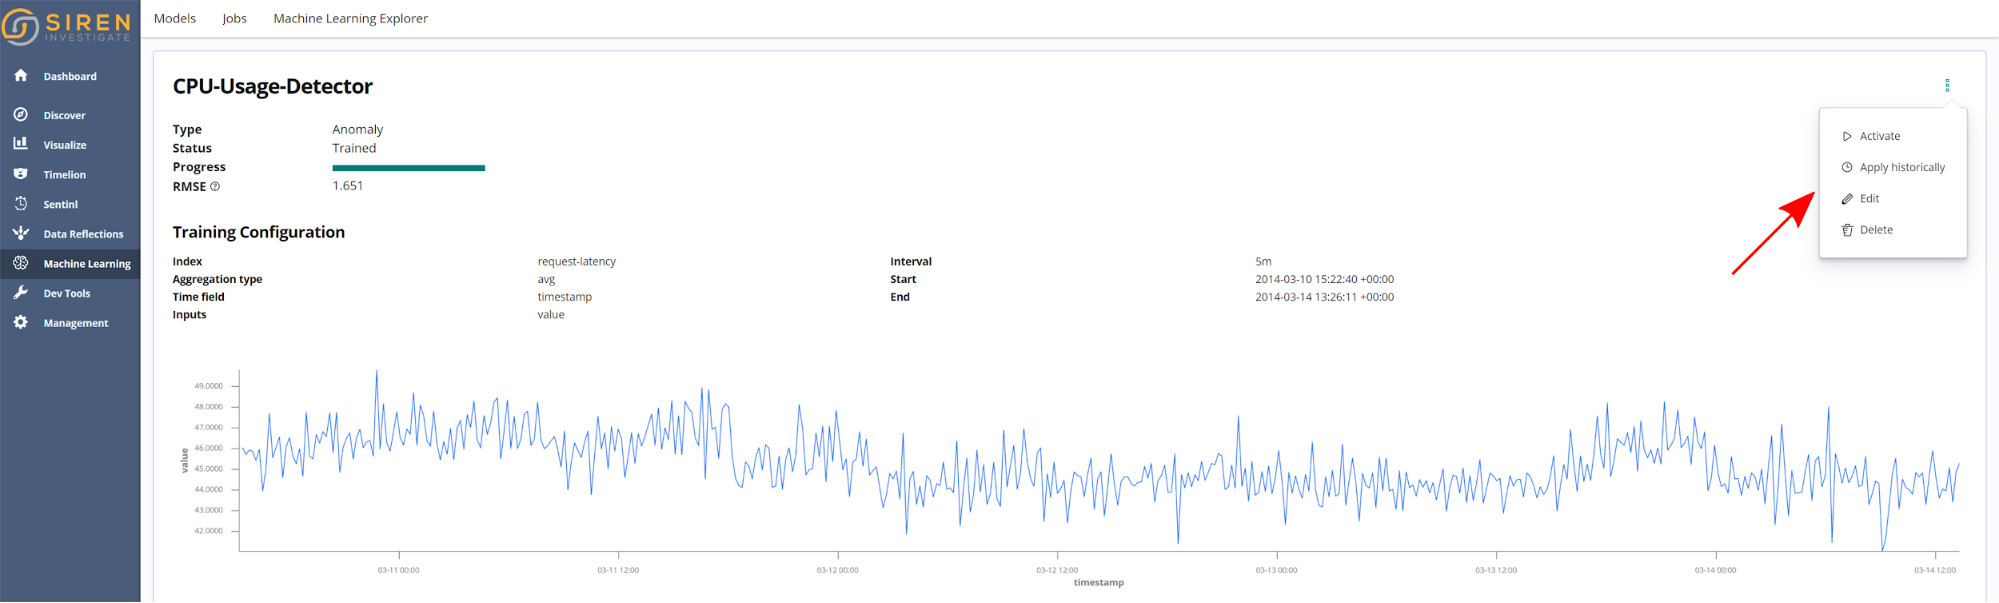
- Activate. When this action is applied, the model is activated to do live detections or predictions, depending on the model type. Therefore, when new data is logged to the Saved Search associated with the model, predictions are made in near real time.
- Apply historically. Select a range to apply historical anomaly detections on. When this action is selected, a page similar to the following screenshot is presented. Interactively select the time range to apply anomaly detection on, and then click Detect. The results of the historical detection will be available to view in the Machine Learning Explorer visualization.
- Edit. Update the model by retraining on new data or make changes to the aggregation and time bucketing settings.
- Delete.

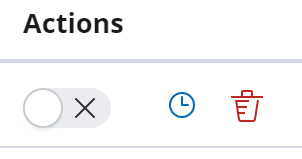
Additionally, a number of actions are available which appear beside each model in the Model page. From left to right, these actions are to Activate, Apply historically, and Delete, respectively.
Step 7. View the machine learning results
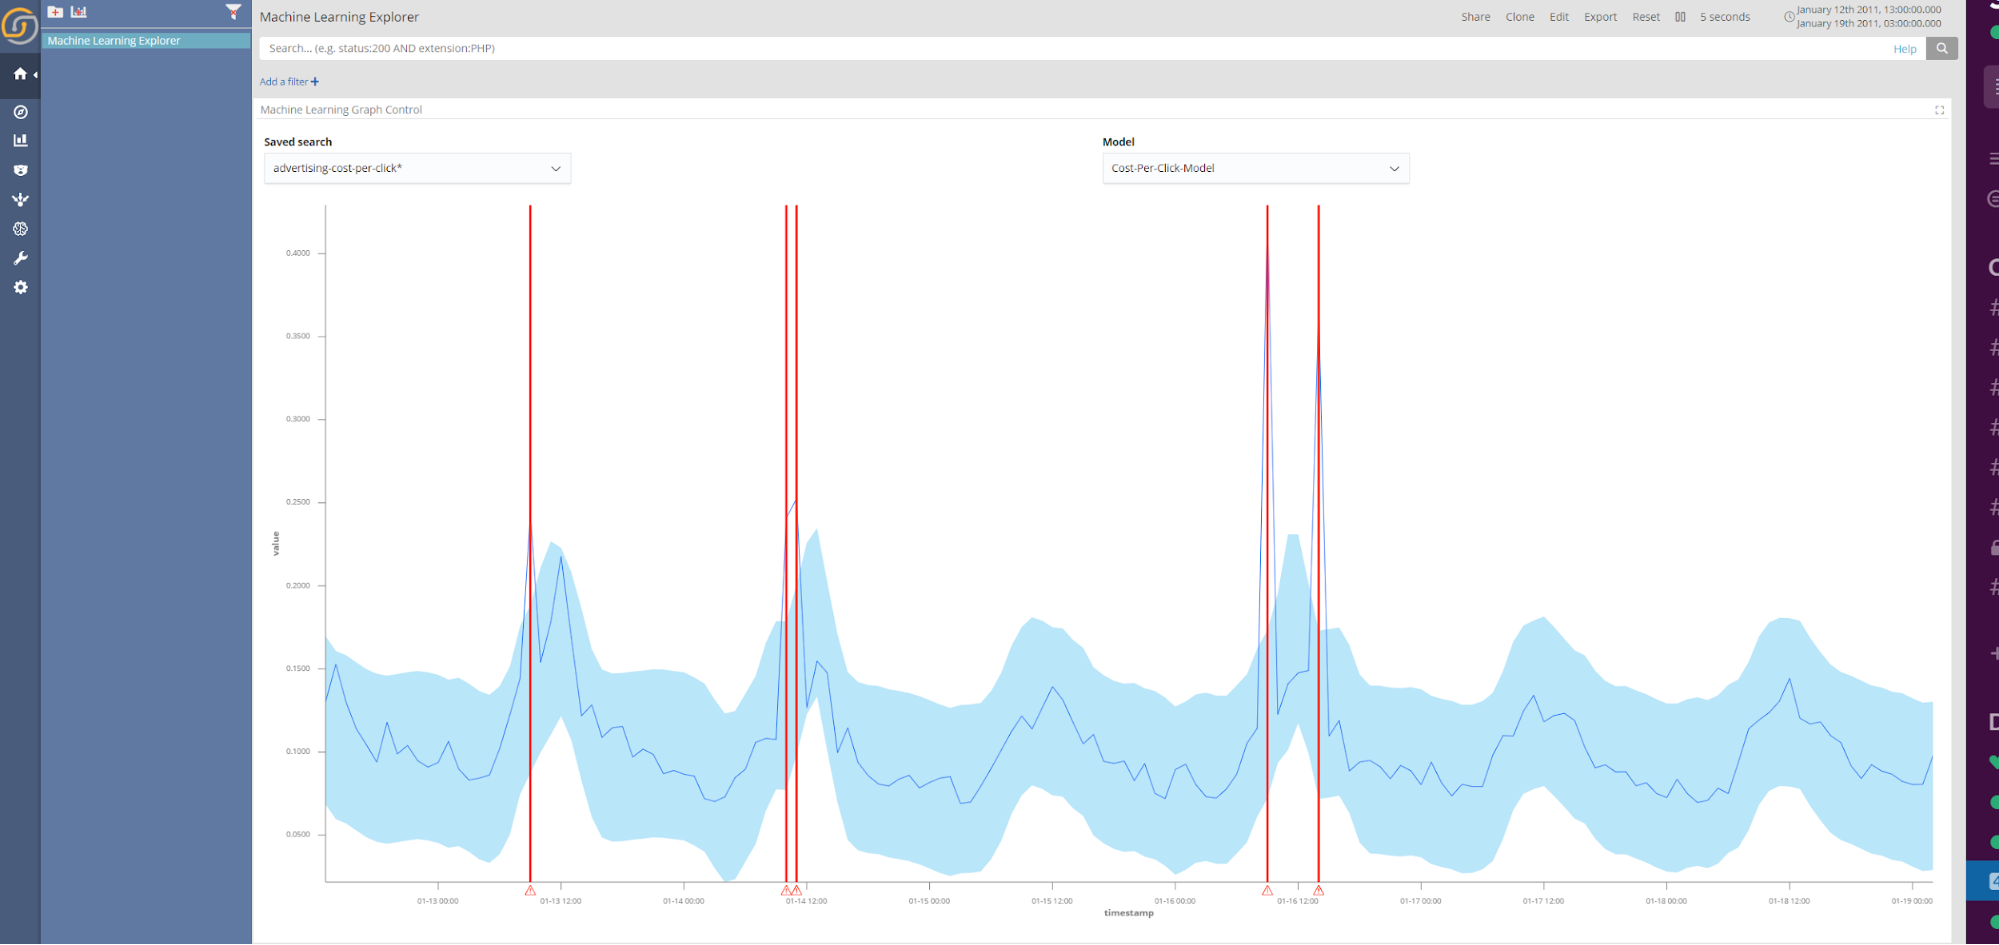
The machine learning results can be viewed in the Machine Learning Explorer. Below is an example of the results shown for an anomaly detection model trained on the cost per click of online advertising.
Step 8. Updating models
If new data trends develop in a Saved Search that was used to create a model, or the frequency at which data is logged changes, it is likely a good idea to update any affected model by using the Edit action, as shown below. When you click Edit you will be brought to a page similar to that in Step 4, where the training range and model settings can be altered.
If only the time range has been changed, transfer learning is applied when updating the model. In this case, the hyperparameters of the original model are maintained and the parameters of the existing model are inherited as the initial state of the new version of the model. In effect, this process fine-tunes the model to learn any new trends in the data. Results of an updated model are shown in the above screenshot. By removing the need for hyperparameter optimization and beginning the model in a pre-trained state, model updating is considerably faster than training a model for the first time. Notably, if changes to time bucketing settings are made, no transfer learning is applied and hyperparameter optimization is used.
If a model is activated to do live detections/predictions while that model is being updated, the old version of the model will automatically be replaced with the new version once training is completed.
Siren ML in Action!
This section presents three use cases of applying machine learning results:
- Anomaly detection for CPU usage data from a server in Amazon’s East Coast datacenter.
- Anomaly detection for the number of NYC taxi passengers.
- Future prediction for the air temperature in Paris.
CPU Usage Anomaly Detection
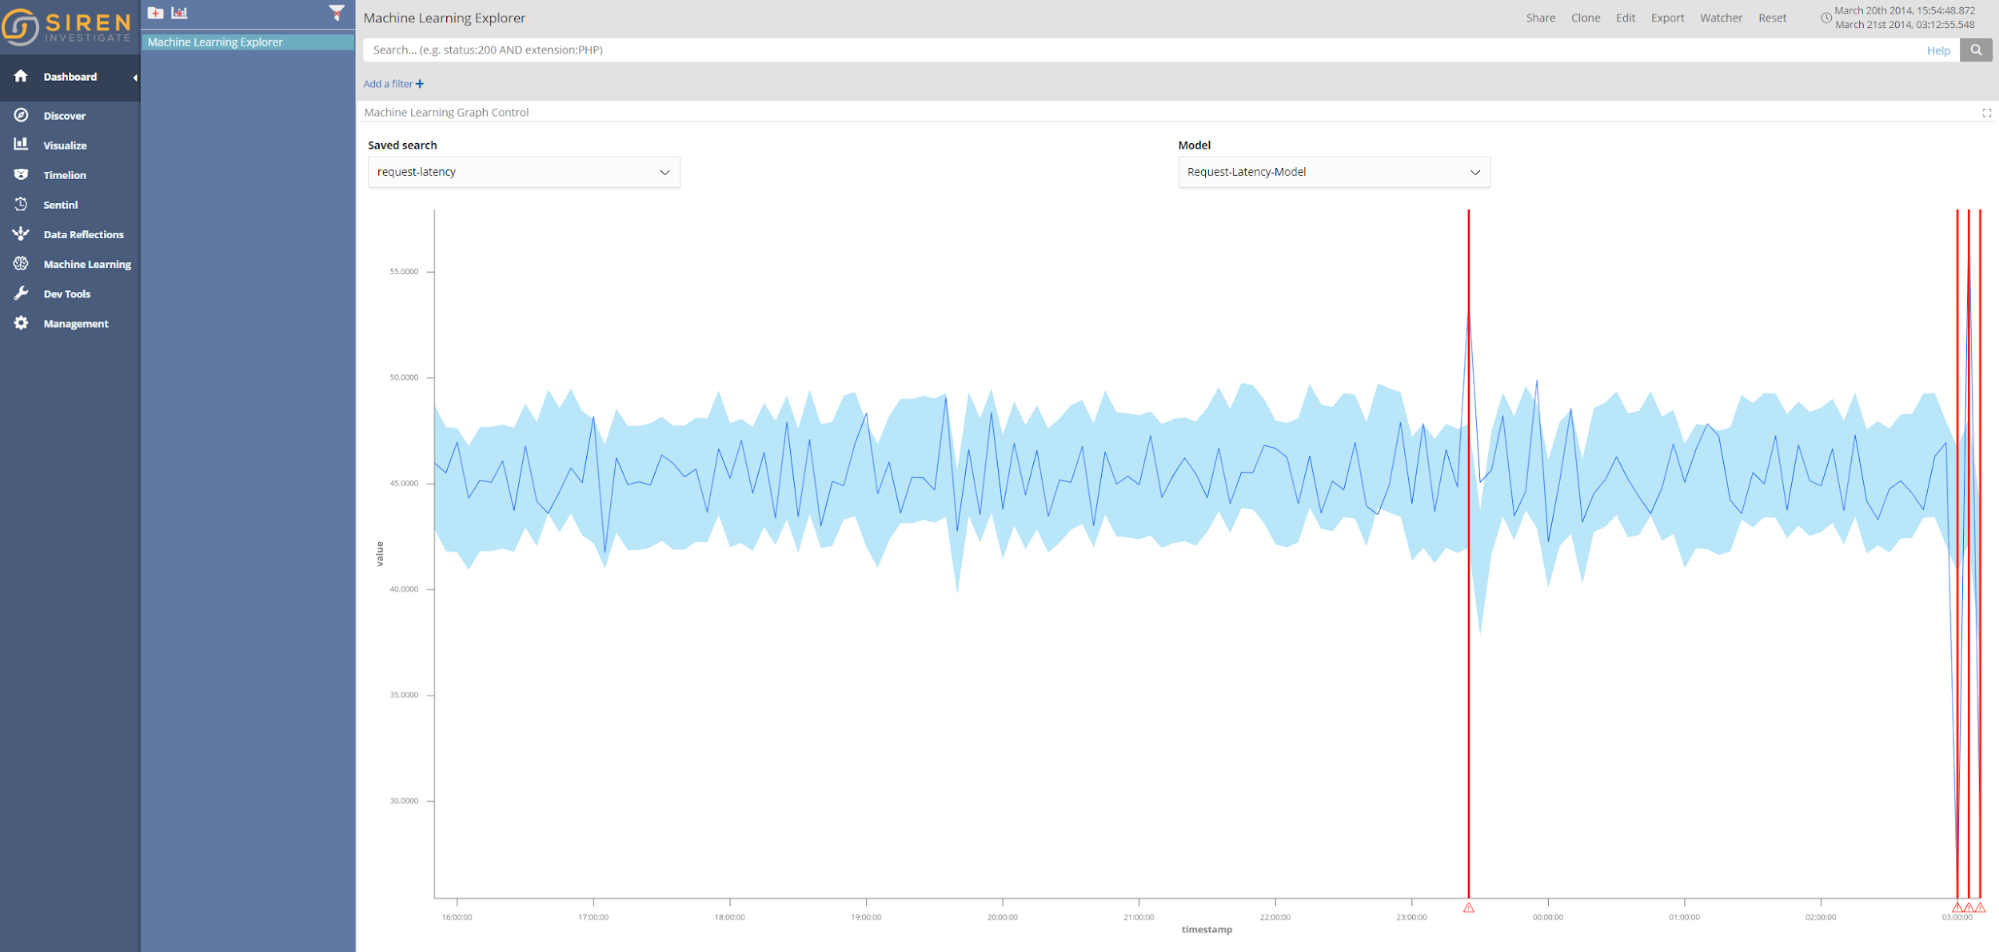
The dataset for CPU usage in a datacentre is taken from the Numenta Anomaly Benchmark dataset, which is a dataset that contains known anomaly causes. In this case, the reason for the system failure is outlined in the Numenta blog. At the end of the dataset there is a system failure resulting from a failure of AWS API servers. As seen from the red lines indicating anomalies in the screenshot below, this event has been correctly identified by the anomaly detection algorithm. Interestingly, an anomaly was also detected three hours before the system failure; which may have indicated a causative issue to system administrators.
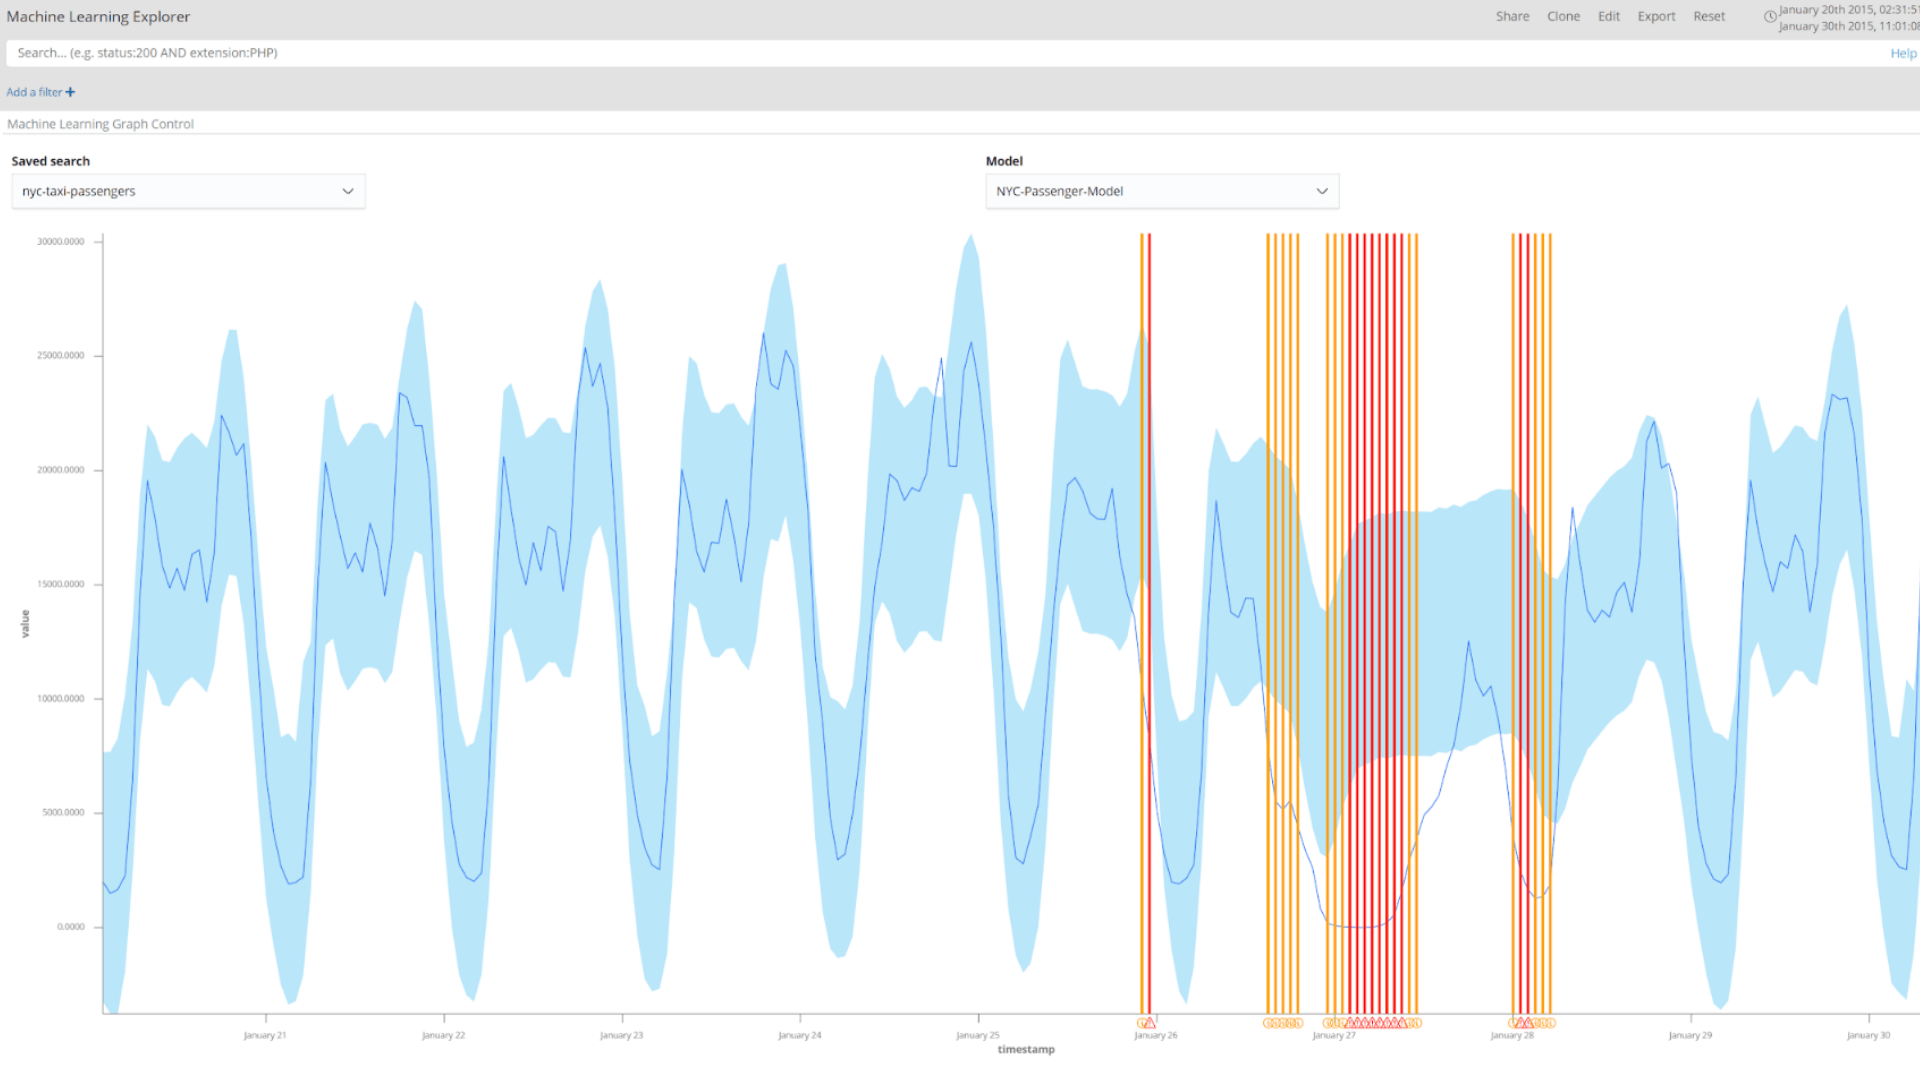
New York City Taxi Passengers Anomaly Detection
The New York City taxi passenger dataset is also taken from the Numenta anomaly benchmark datasets—this dataset records the number of passengers in the city over 30-minute intervals. Again, the causes of anomalies within the dataset are known. The figure below shows the results of applying historical detections to the dataset. The large anomalous event highlighted, which resulted in a significant reduction in the number of taxi passengers, is the consequence of the January 2015 North American Blizzard.

When encountering new datasets, training an anomaly detection model and applying historical detections can be a useful first step in identifying significant events during an initial investigation.
Keeping an eye on the future: Combining future predictions with Siren Alert watchers
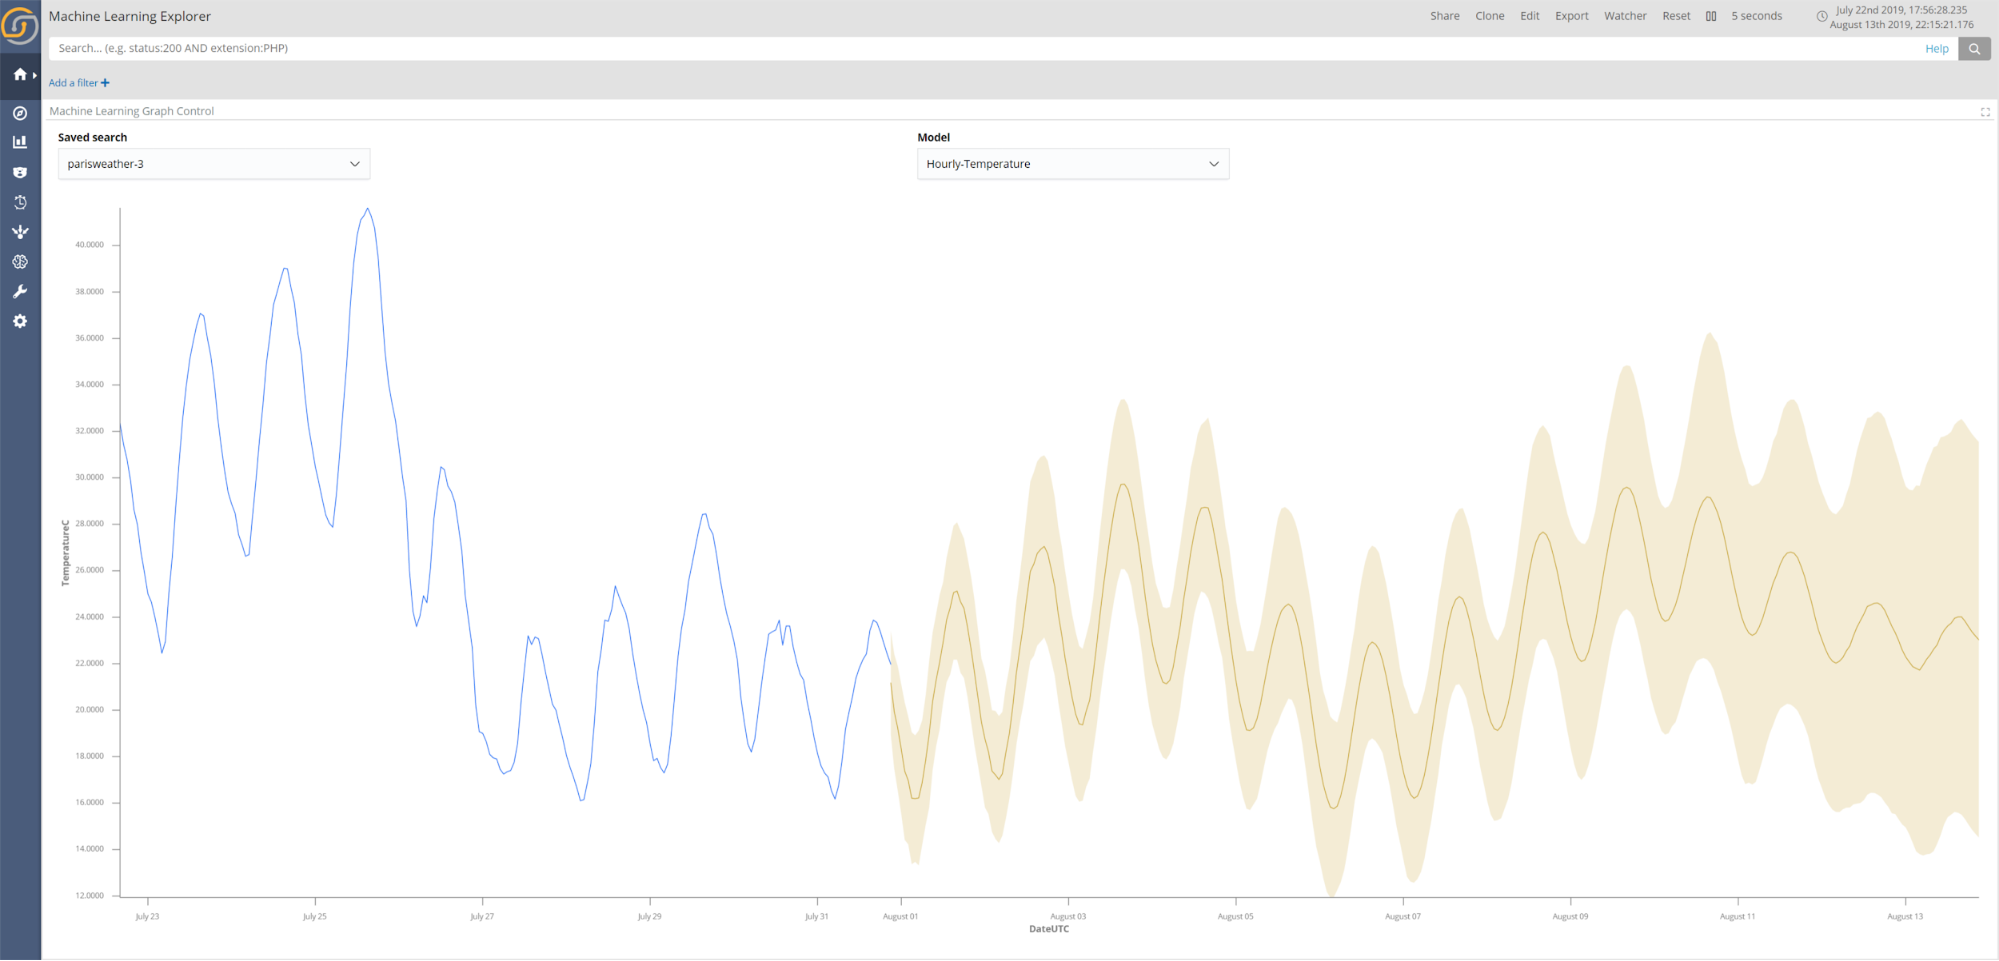
The final use case uses meteorological data from multiple weather stations in Paris to predict the temperature for the next two days at hourly intervals. The resulting temperature prediction from the trained model is shown in the screenshot below.
In addition to viewing predictions in the Machine Learning Explorer, Sentinl watchers can greatly improve the utility of future predictions by enabling alerts on predicted future events. For example, being alerted of extreme weather conditions days in advance could aid the management of hospitals in determining required staffing levels.
The following steps outline how to create a watcher on future predictions:
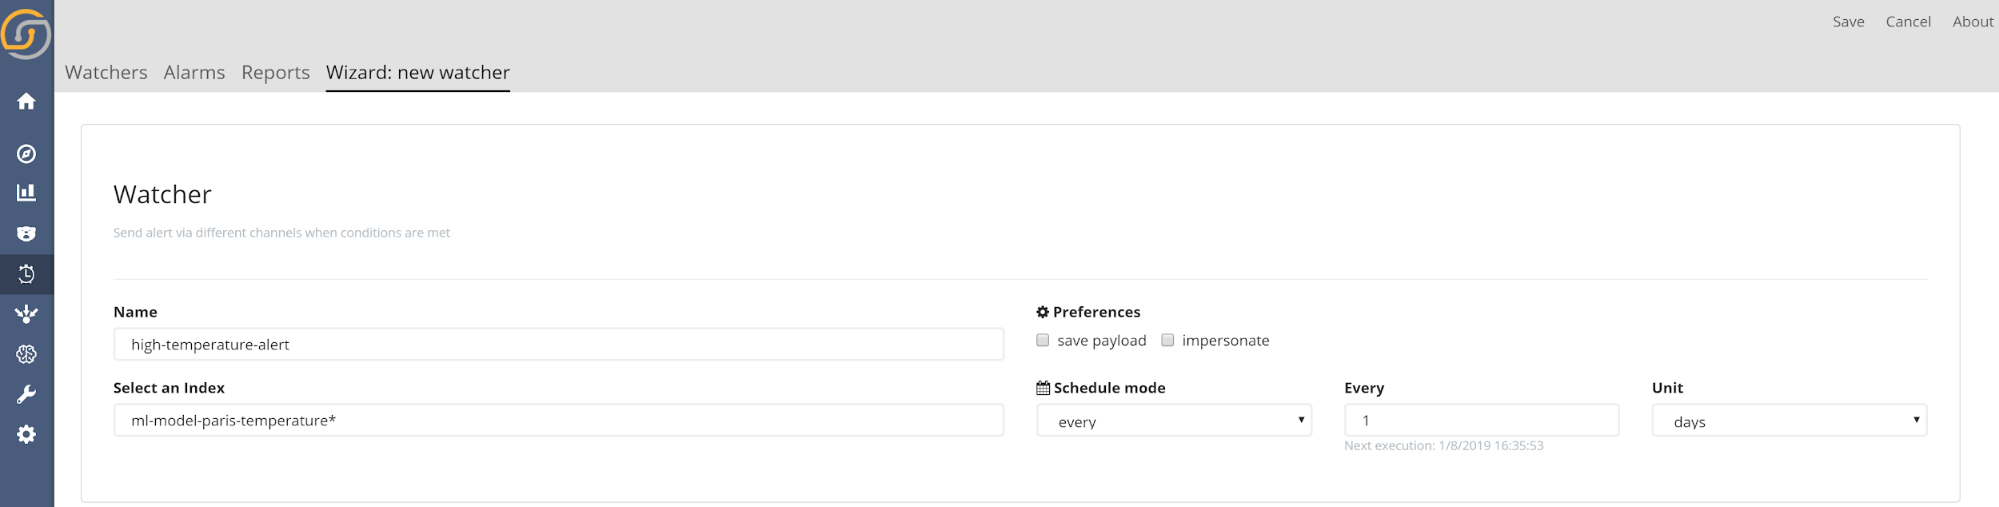
- Open the Siren Alert application. Once opened, create a new watcher with the Watcher Wizard.
- Set the details of the watcher. When you are selecting the index make sure to use ml-model-your-model-name*. All machine learning results are stored in indices with this naming convention. As an example, if a model is named Website-Traffic-Predictor, the watcher index should be set to ml-model-website-traffic-predictor*.
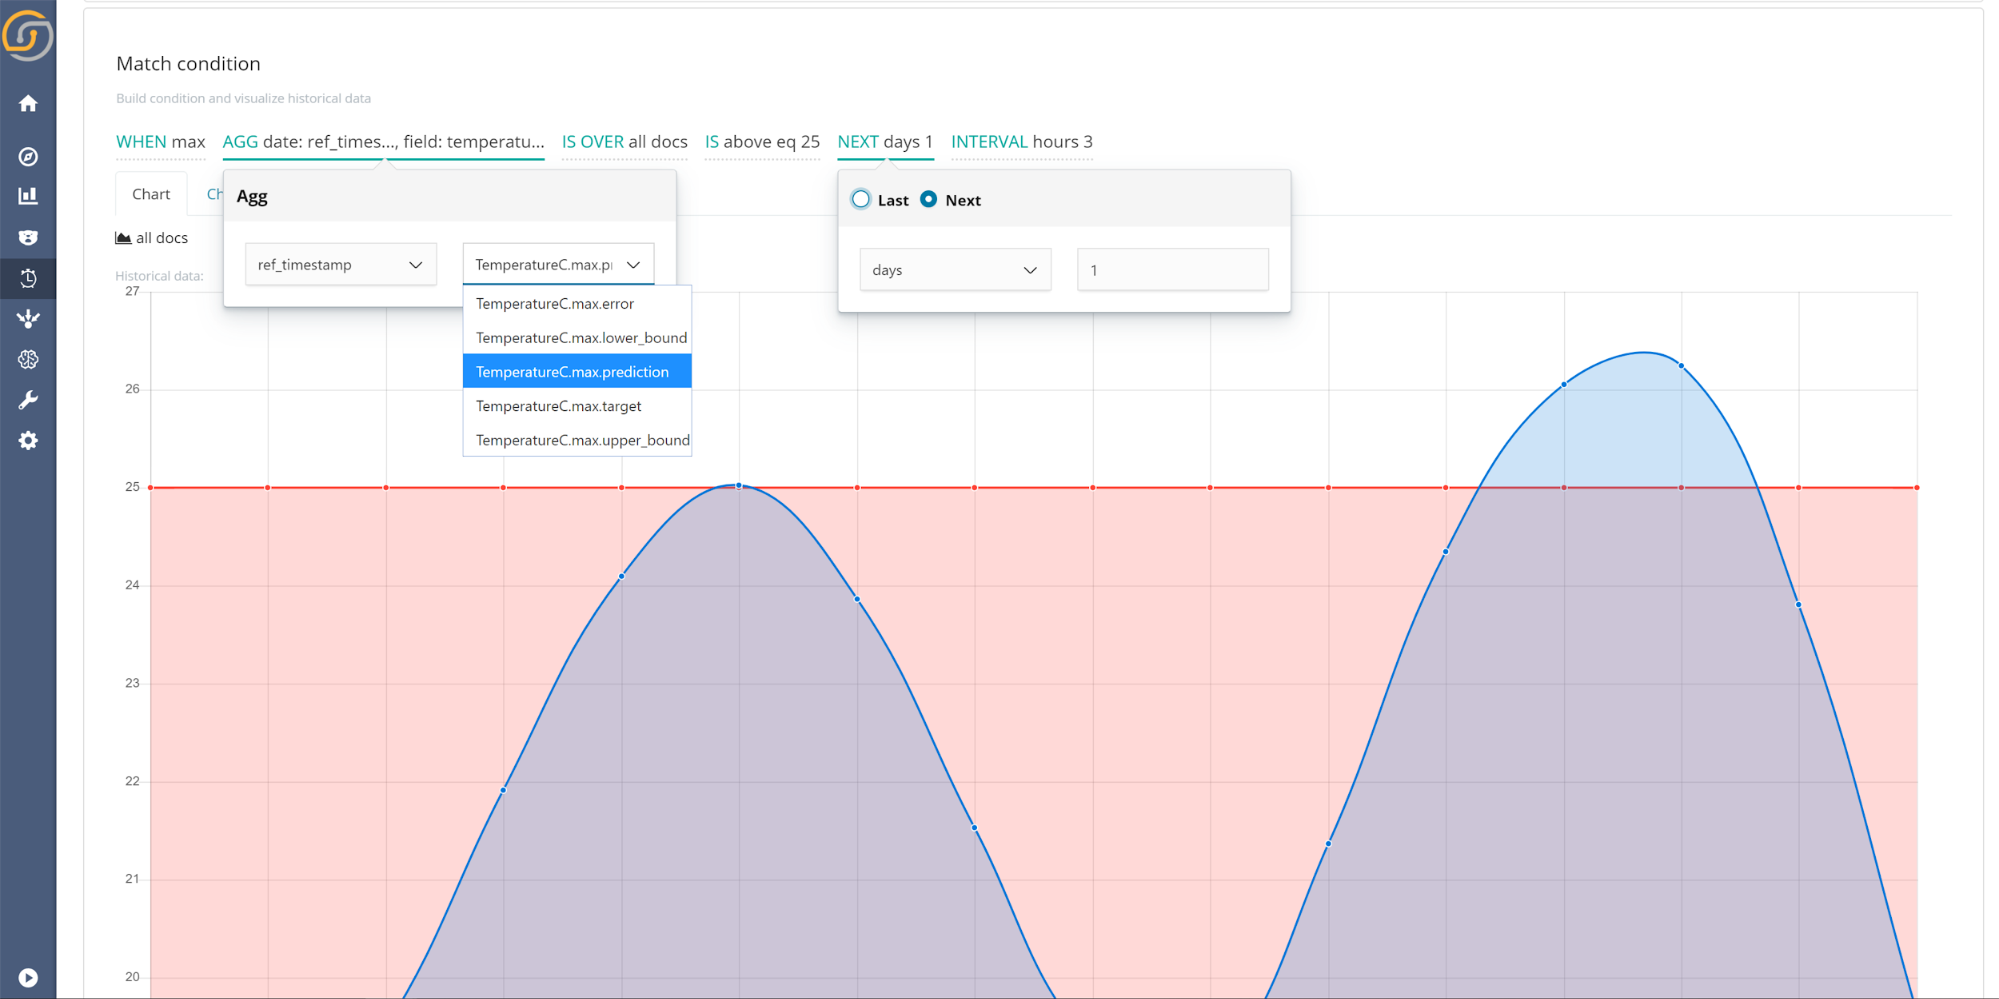
- Set the match condition for the watcher. Siren 10.3 brings a new feature to Siren Alert, which is the ability to set watchers into the future. To do so, simply select the Next option when selecting the time range. When selecting the field to watch, it is advised to select the models prediction (as shown in the screenshot below). However, if the consequences of an event are particularly detrimental, using the upper or lower bounds offers more conservate alerting. In the case shown above, the watcher will send an alert as the predicted value (shown in blue) is above the selected threshold (red).
Watchers can also be combined with anomaly detection results for near real-time alerting. The steps for setting up a watcher for anomaly detection are the same as those used for future predictions, with just some small differences in the match condition. There changes are:
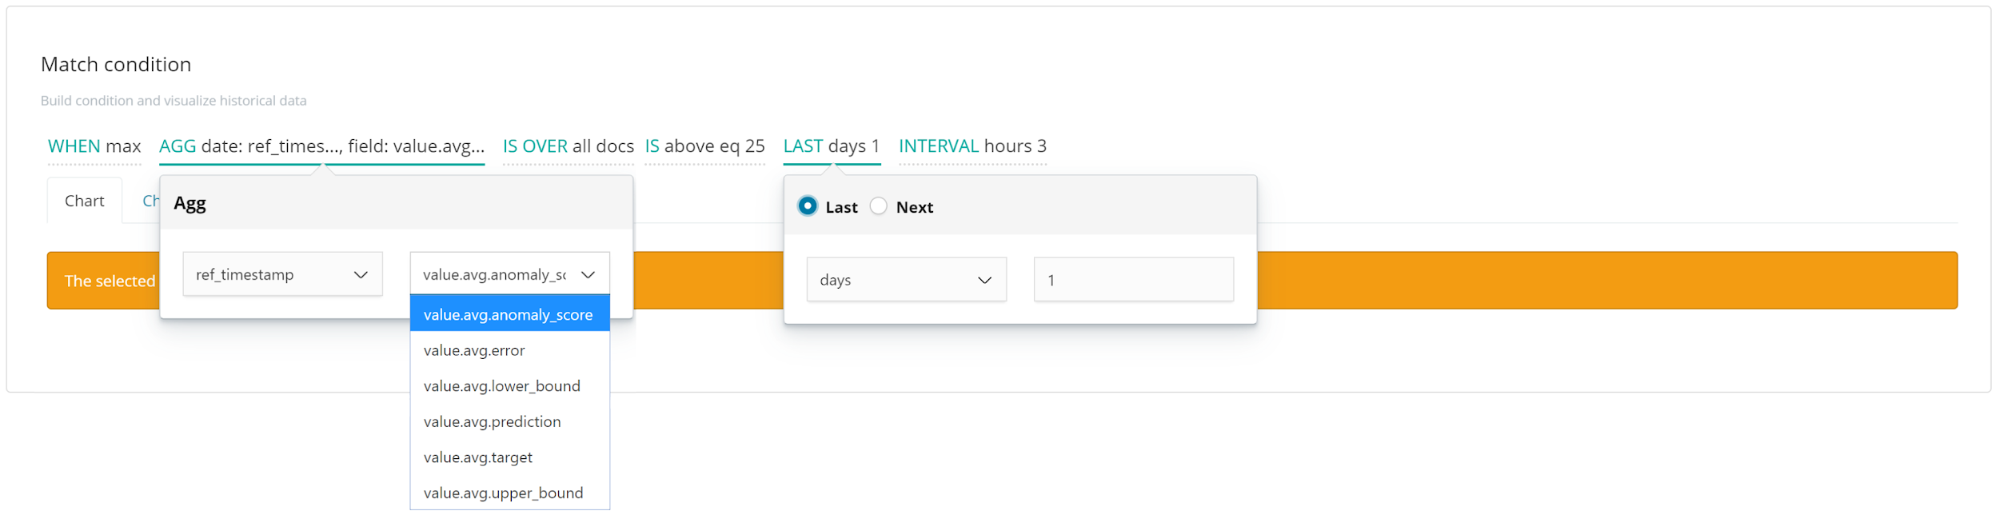
- Use the Last option when selecting the time interval, as both the predicted and actual values are required to determine if an event is anomalous.
- Select the anomaly score as the field to aggregate. The anomaly score is a numeric value expressing how unexpected an event is. A value of 0 indicates that the predicted value matches the observed value exactly, a value of 1 indicates the observed value is at either the predictions upper or lower bound, and all values above 1 indicate that the real value is outside of the prediction bounds. Therefore, setting a threshold above a value of 1 is suitable when setting up a watch for anomaly detection. One advantage to using watchers on the anomaly score is that the threshold is configurable; therefore, the match condition threshold can be set in proportion to the importance of identifying anomalies.
What’s Next? Everything!
By designing Siren ML on top of state-of-the-art TensorFlow/Python, wrapped in APIs and Docker, it is quite easy to add new abilities to Siren ML, so the sky is the limit!
Next in line for Siren ML are:
- Population-based anomaly detection. Detect the outlier time series out of a large group—for example, which of a million phone users might be experiencing troubles or exhibiting fraudulent behaviours.
- Classification. Train classifiers to predict categorical outputs.
- Multivariate models with the potential for multiple backend sources. Easily include multiple sources of data as inputs to improve the accuracy of predicting (one or more) outputs.
Availability
Siren ML is available on request in an unrestricted form in Siren Community Edition. Contact us for more information.


